Product from:
Shop product(s) total:
Total Tax
Quantity:
Total:
Product from:
Shop product(s) total:
Total Tax


The heart of a good sales ad is a high-quality picture. It's the first element a potential buyer notices, and it determines whether they're interested or just scroll right past. The good news is you don’t need an expensive DSLR camera or a degree in photography. The smartphone in your pocket is more than enough to create images that make your used gear stand out from the crowd.
We’ve put together a practical, step-by-step guide to help you take the best possible photos of the equestrian gear you're selling, using just your phone. Let's get started!
Before you even pick up your phone, make sure the item you're selling looks its best. Think of it as a product presentation for the buyer – you want to make an impeccable impression!
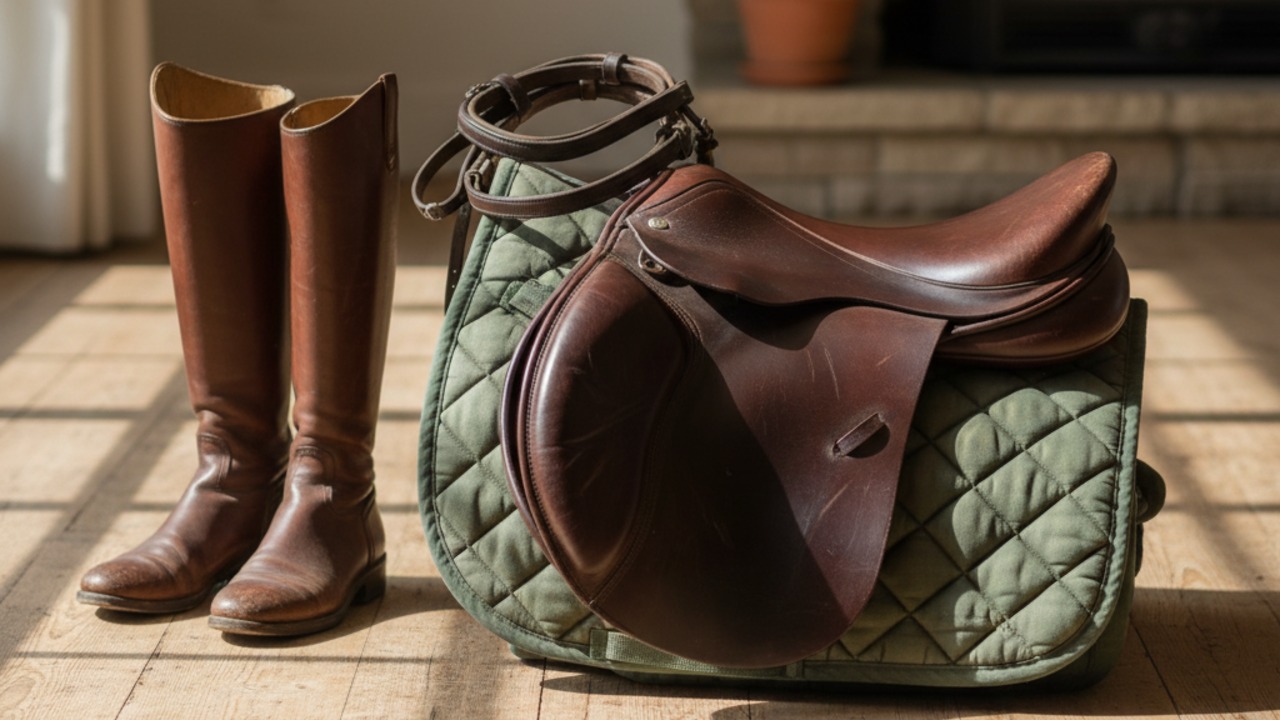
Clean, clean, and clean again! This is the absolute most important step. Wash textile items (saddle pads, rugs) and thoroughly treat leather tack with special conditioners. A polished saddle or sparkling clean boots are far more appealing in a photo than dusty and muddy items.
Document the condition honestly. Look over the item with a critical eye. Is there a scratch, a sign of wear, or a repair somewhere? That's completely normal! Honesty is key in sales. Don't try to hide flaws – instead, take separate, clear pictures of them. This builds trust and saves you from misunderstandings down the line.
The two pillars of a professional photo are light and background. Luckily, the best light is completely free, and a suitable background can be found around any stable.
Forget the stable's yellow lamps or taking photos with a flash. These distort colors and create ugly shadows. Go outside!
Ideal time: The best time to take photos is on a slightly overcast day. The cloud cover acts like a giant professional "softbox," diffusing the light evenly and softly. This brings out the item's true colors without distortion.
What to avoid: Shooting in direct sunlight is one of the most common mistakes. The problems with bright sunlight are:
Harsh shadows: Deep black shadows form under the item, hiding details.
Strong glare: Especially on leather (saddles, bridles) and metal buckles, the sun creates reflections and "blown-out" highlights that hide the actual condition.
Color distortion: Intense light can make colors appear brighter or more faded than they really are.
If the sun is shining: If you must shoot on a sunny day, find an open, shady spot—for example, near the wall of a building (but not right against it) or under a large tree where dappled shadows won't fall on the item.
Your product for sale must be the star of the picture. Don't let the background steal the attention. Avoid messy stable yards, a muddy driveway, or parked cars.
Good and simple backgrounds include:
A solid-colored wall of a stable or indoor arena
A tidy wooden fence
A well-kept lawn (but read the next point!)
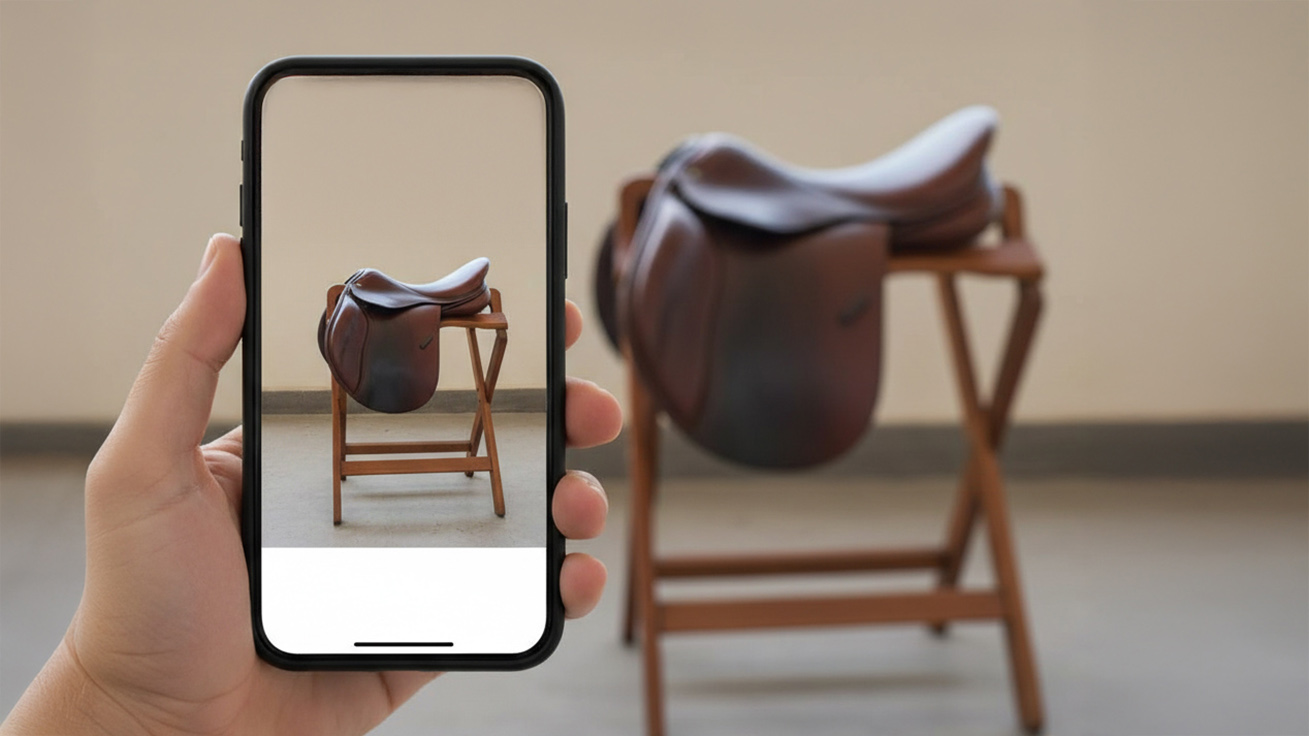
This is a simple trick that will instantly make your photos look more professional. The idea is that the farther the background is from your subject, the blurrier it will become. This brings the item into sharp focus and creates a beautiful visual effect.
This is exactly why it's not a good idea to place a saddle pad or halter directly on the grass. These items are on the same plane as the grass, and the busy texture of the grass will compete with the product in the picture and be distracting.
How to achieve this?
With physics: Hang the halter or bridle on a fence post, not flat against a wall. Place the saddle on a saddle rack in the middle of the yard and choose an angle so that the background (e.g., a distant line of trees) is as far away as possible.
With phone “magic”: The easiest way is to use your phone's PORTRAIT MODE. This feature is designed specifically to detect the subject in the photo and automatically blur the background. Definitely try it!
One picture is never enough. The buyer wants to see the product from every side, as if they were holding it themselves. The more you show, the more confident the buyer will feel, and the fewer follow-up questions will be asked.
Take overview shots: Photograph the item from the front, back, both sides, bottom, and top.
Photograph details: Take close-ups of buckles, stitching, the manufacturer's logo, serial number (especially on saddles), and the material's texture.
Photograph flaws: Take clear close-ups of any scratches, repairs, or signs of wear that you mentioned in the description.
Photo gallery idea: Create a photo series of a saddle for sale: 1) classic side view on a saddle rack, 2) view from the front to show the gullet width, 3) view from underneath to assess the condition of the panels, 4) close-up of the billet straps, 5) close-up of the maker's mark/serial number, 6) an honest close-up of a specific wear mark on the saddle flap.
Wipe the lens! The simplest and most often forgotten action. A blurry fingerprint on the camera lens will ruin even the best composition.
Don't use zoom. The phone's digital zoom significantly worsens picture quality. Move closer to the item yourself!
Hold the phone steady. Brace your arms against your body or use a support to avoid camera shake and blurriness.
Edit minimally. You can slightly brighten the picture or increase the contrast in your phone's photo editing app to make it look more vibrant. But avoid filters that change the item's actual color!
Taking good sales photos isn't rocket science. It just requires a bit of care and forethought. Remember the three golden rules:
A clean and presentable item.
Good natural light and a calm background.
Lots of photos from different angles, including details and flaws.
Now grab your phone and try it yourself! Happy shooting and successful selling!